Showing posts with label {DIY}. Show all posts

{DIY} Dollhouse

We've had a great week showcasing the work of Kristen Duke Photography  and we're wrapping it up with a DIY dollhouse. A collaboration of Kristen & her hubby this gorgeous dollhouse is every little girl's dream.
Thanks so much to Kristen for sharing the amazing parties, showers and this awesome DIY.


Pin It Now!

{DIY} Print your own photo canvas

I came across the DIY Print Your Own Canvas Post and just had to share it.

In 15 minutes and for $40 you can create your own Print Canvas...here's how :::

You'll need:


canvas {must be the size of US paper or smaller}
modge podge
brush
tissue paper
brown acrylic paint {or latex/house paint}
1 sheet of card stock 


A few notes on canvases: I stretched my own.  I really like the look of a canvas that is at least 2" depth on the sides, and a lot of the ready-made canvases are only 1/2" depth.  So, for this project, I stretched my own.  I actually stretched it around a box, then covered the back with brown paper.  It looks very much like how you would see purchased art canvases in a store.  Anyhow, whatever you use, you will need one canvas the size of US paper or smaller.  You might be able to make it work to piece sheets together if you are extra, extra careful and go larger.  But, you will probably see the seams.

Select your photo that you want to mount.  Then, take your sheet of card stock, and wrap your tissue paper all the way around the paper, taping the corners on the back like a present.  The tissue paper needs to be very tight and wrinkle free.  If it's not tight, you will get wrinkles and smudges in your image when you print it.  {I had to print this picture 3 times, and finally I got one without smudging.}  It looks like 
this coming out of the printer--see how the tissue paper can wrinkle so easily.

After you have your photo printed to tissue, cut it off the card stock with at least an inch of overhang.  Next, brush a very think layer of modge podge all over the top of the canvas.  While the modge podge is still wet and being very careful, lay your image on the canvas, and work very quickly to smooth out wrinkles.  Be careful because the tissue will tear if you move the image a lot or press too hard.  This is what mine looked like before I started smoothing: 

After the image is all smoothed out, trim the edges with scissors.  Then, cover the entire picture with a thin layer of modge podge, using care to smooth down the edges.  If you are slow, the colors will smear, so work fast and don't be too liberal with the modge podge.

Lastly, using acrylic paint, paint the edge of the canvas in whatever color coordinates with the image.  If your canvas was really tiny, you could even wrap the sides with the photo and skip the painting part.

And, voila--15 minutes later--your own photo canvas!  I will caution you, it's almost impossible not to get a few wrinkles, but the texture of the canvas really comes through!  Also, I think this would also be great to print your own artwork {like still life} for a kitchen or something because then wrinkles could add to the image; whereas with photos, wrinkles are not as desirable.


Thank you Jessica for sharing your great DIY!

Pin It Now!

{DIY} Party Ideas

To kick start a great week of amazing events we have some fun & easy DIY projects and ideas from the fabulous ladies of One Charming Party. Photographed by the talented Dirk of Widdison Photography  and oozing with creativity you're going to adore every last DIY detail.
Activity Jars
Set out jars that contain props for various activities. The jars above contain bubble gum, mini bubbles, sidewalk chalk, and sand shovels.


Cupcake Toppers


Cupcake toppers are a great way to personalize everyone's favorite snack. Not only are they adorable but they're super easy to make.

Directions:

1. You will need: tape, adhesive of your choice, lollipop stick, ribbon, and any paper shapes that you want to use. A scalloped punch, a smaller circle punch, and a number “1″ punch is used above.
2. Using adhesive, stick the “1″ onto the small circle and then stick those onto the scalloped circle.
3. With a small piece of tape tape a lollipop stick to the back of the scalloped circle.
4. Tie a ribbon on the bottom. 
Banner

A banner is the unofficial birthday party must and here's a great way to custom make one to fit your party's theme.

Directions:

1. Cut out circles and letters, about 3 or 4 inches.
2. Choose your ribbon color
3. Using adhesive, stick the letter to the circle
4. Hole punch two holes to the top of the circle to thread ribbon
5. Thread the ribbon through the top, leaving enough ribbon on each side to hang

Vinyl Decals
Vinyl stickers are a great way to display the age or whatever else you choose. The above vinyls are from Chatty Walls.
Drink Station

Take the labels off water bottles for a much cleaner presentation.
Pin It Now!

{DIY} Memory Game Wall Art

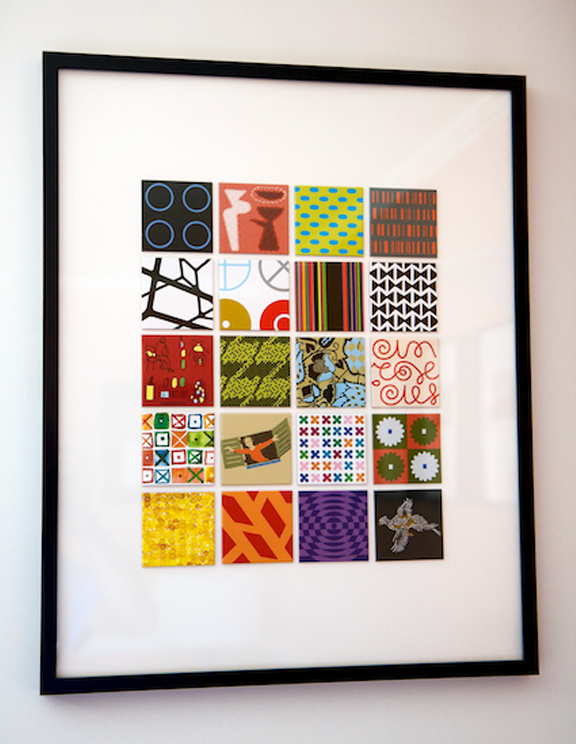
We are so excited to share this awesome DIY project from Jessica of The Paper Plume. This super easy DIY is easily customizable & a great addition to any room. {See below for a chance to win a Memory Game Wall Art  from The Paper Plume}

Materials:
1. Memory Game of Your Choice
2. Pencil
3. Double-sided tape
4. Ruler
5. 16" x 20" Poster Frame 
Directions:
1. Determine the center of your mountboard.
2. Lightly draw a line down the center of the board both ways.
3. Lay out your tiles 4 across and 5 down starting from the center line you lightly drew, working your way outward.
4. Adhere the tiles with double-sided tape. Wall art shown has approximately 1/4" between each tile. You will end up with a border of about 2-3/4" on the sides and 3-1/4" on the top and bottom
{Visit The Paper Plume for a chance to win a Memory Game Wall Art Piece.}
Pin It Now!

{DIY} Baby Gate

Here is a fabulous DIY baby gate that is functional, charming and can be built for a fraction of some of the store bought baby gates.

Photos & design via Blue Ant StudioPin It Now!

{DIY} Baker's Twine...You have my heart on a string

It seems that everywhere you look there is a new & delightful way to use Baker's Twine and with these super easy DIY instructions it's easy to coordinate with your color scheme and string it on anything your heart desires.
Here are some fun ways to use baker's twine.
1. www.ashleyannphotography.com 2. www.moderngirlstyle.com 3. www.etsyitemoftheday.com 4. www.creatingcoutureparties.com 5. www.ohhellofriendblog.com 6. www.wemetinabar.com 7. www.purplepug.com 8. www.thetwineryblog.blogspot.com 9. www.whiskergraphics.com 10. www.whiskergraphics.com 11. www.thetwineryblog.blogspot.com 12. www.craftygrldesigns.blogspot.com
Pin It Now!

{DIY} {DECOR} Chandeliers

I came across this beautiful nursery with a fabulous bird cage chandelier and was inspired to find other amazing DIY chandelier designs.
Click on the pictures for the DIY instructions.


Pin It Now!
{DIY} Baby Mobiles

Check out these super sweet DIY baby mobiles. Click on the picture for how-to! Happy crafting!


Pin It Now!